Before and After wedding editing tips!
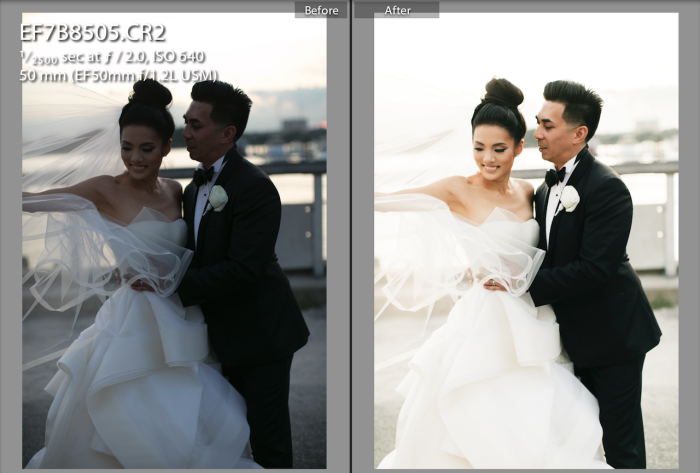
Hey y’all! I got a ton emails this week requesting before and after photos so I am gonna start sharing once a week.
You can se the setting in this photo on the screen shot above. For this photo I used my preset available for you here. Then I brought the exposure up 1.5 stops .highlights down , shadows up, and warmed up the temp . and there you have it!
Keep looking at the store I am working on a FULL preset collection Its gonna be awesome. The one I offer now is at a very affordable price and awesome for those of you that shot is mostly natural light. But I am working on one with much more detailing, well you will just have to see.Hopefully finished in the next few weeks as well as my “Busy girls nutrition guide” SO keep your eyes peeled!
Thank you so so so much fryer support!
All my love!
Stay Inspired!
Jana
Oh and sign up for my mailing list so you will be the first to hear about all the new things coming up! Like random meet ups and giveaways!
Sign up here









Hi Jana, how do you have your white balance set? When do you change it, if at all?
-Cindy Avila
Very nice tips, thanks for sharing
Hey Jana, I was really looking for tips to brighten up dark photos like the one you have shown above. The lightroom preset you have recommended there looks good, I might go for it. Will also be checking out to see more presets.
Thanks a lot for the share.
Fiona
Hi Jana Williams,,
Thanks for sharing photo editing tips shared by you.
We all face this type of problems nowadays, bad-light is one of the biggest enemy of wedding shots and very good shots are spoiled. Nowadays we have many of the photo editors which can edit your photos and can make it according to you.
Although good article and nice tip you shared. Keep sharing your ideas like this.
Have a nice week.
~ Harshwardhan
Hi,
It’s remarkable tips. No doubt! I am really impressed by your tips. Wonderful explanation. Would you please mention that which tools did you use especially for wedding photo editing?
Many many thanks.